

Steps to Building Safe & Stylish Deck Stairs
Building deck stairs can be challenging, but it’s an essential part of making your outdoor space accessible. Well-built stairs add functionality, usability, and aesthetic appeal to your deck. At Pacific Northwest Decks, we take pride in constructing strong, code-compliant, and visually appealing stairs. In this guide, we’ll walk you through each step, using our professional techniques to ensure quality.
Before You Begin Construction
Before you start building, ensure you have the necessary tools, materials, and permits. For information on permits, read our article Do I Need a Permit to Build a Deck?.
Planning Your Deck Stairs
Proper planning is crucial to building safe and code-compliant deck stairs. This involves measuring the total rise, determining the number of risers and treads, and ensuring the placement adheres to Spokane’s code requirements.
Measure the Total Rise to the Deck Landing
The total rise is the height from the ground to the top of the deck. This measurement determines the height your stairs need to cover. Use a tape measure to determine the total rise. In Spokane, building codes require that the rise of individual steps cannot exceed 7 ¾ inches.
Calculate the Number of Risers
Divide the total rise by 7 inches (the typical riser height) to determine the number of risers. For example, if the total rise is 28 inches, you would need four risers. Adjustments may be necessary to ensure that all risers are equal and do not exceed the maximum 7 ¾-inch code requirement, with no riser differing from another by more than ⅜ inch.
Calculate the Number of Treads
The number of treads equals the number of risers minus one. For example, four risers would require three treads. At Pacific Northwest Decks, we use 10 ¾-inch treads to accommodate the correct overhang and spacing for composite decking, ensuring a comfortable and durable stair setup.
Plan the Total Run and Stair Placement
The total run is the horizontal length of the entire staircase. Multiply the number of treads by the tread depth (e.g., 3 treads x 10 ¾ inches = 32 ¼ inches). Use a level and spray paint to mark where the stairs will attach to the deck and where they will land on the ground. Landings are often required for longer staircases to break up the run, making them less steep and easier to use. Spokane’s code also requires a solid landing, extending at least 3 feet in front of the bottom step and matching the stair width.
Tools and Materials Needed
Before you begin construction, ensure you have the necessary tools and materials.
List of Required Tools
- Circular saw: For cutting stringers and deck boards.
- Framing square with stair gauges: For marking and cutting stringers accurately.
- Level: For checking alignment.
- Tape measure: For precise measurements.
- Drill: For securing components.
- Hammer: For adjustments during framing.
- Safety gear: Goggles and gloves for protection.

Materials for Deck Stairs
- Pressure-treated 2x12s for stringers
- Composite or wood deck boards for treads
- Hot-dipped galvanized nails for framing
- Galvanized screws for securing treads
- 4×6 blocking for picture framing
- GTape for sealing stringer cuts
- Fascia boards to wrap the sides and front of the stairs
Measuring and Cutting the Stringers
Stringers form the backbone of your deck stairs and must be accurately measured and cut to ensure stability and safety.
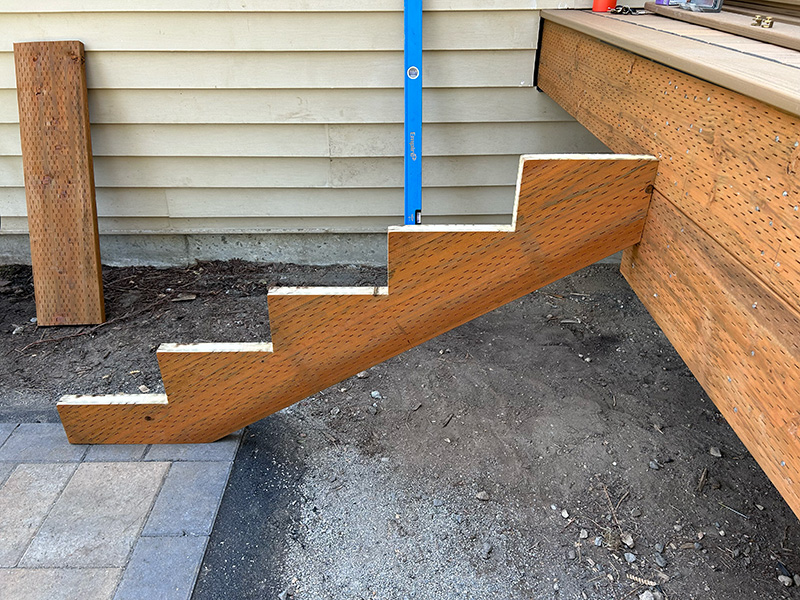
Mark and Cut the First Stringer
Using a framing square with stair gauges, mark the first stringer on a pressure-treated 2×12. Align the stair gauges with the rise and run dimensions, making sure the lines are clear and precise. Cut the stringer along the lines and trim the tread thickness from the bottom step to ensure that the first step is not too short and the last step to the ground is not too high. This step ensures uniformity across all risers.
Use the First Stringer as a Template to Cut the Rest of the Stringers
Once the first stringer is cut, use it as a template for the remaining stringers. Place it on top of each new 2×12, trace the lines, and carefully cut to match the template. This ensures uniformity and stability across all stringers.
Install Fascia on Stringers
Before attaching the stringers to the deck, install fascia boards on the sides of the stringers. The fascia wraps the outside stringers, providing a clean, finished look and covering gaps that could allow a 4-inch ball to pass through, which is against code.
Preparing the Landing
Before attaching the stringers, establish a solid base for the stairs to land on.
Establish a Solid Base
The landing must be stable, flat, and solid. Clear the area where the bottom step will sit, leveling the ground. If necessary, pour a concrete pad or build a paver patio to serve as the landing. This ensures that the stairs have a solid foundation and comply with Spokane’s code requirements.
Assembling the Stairs
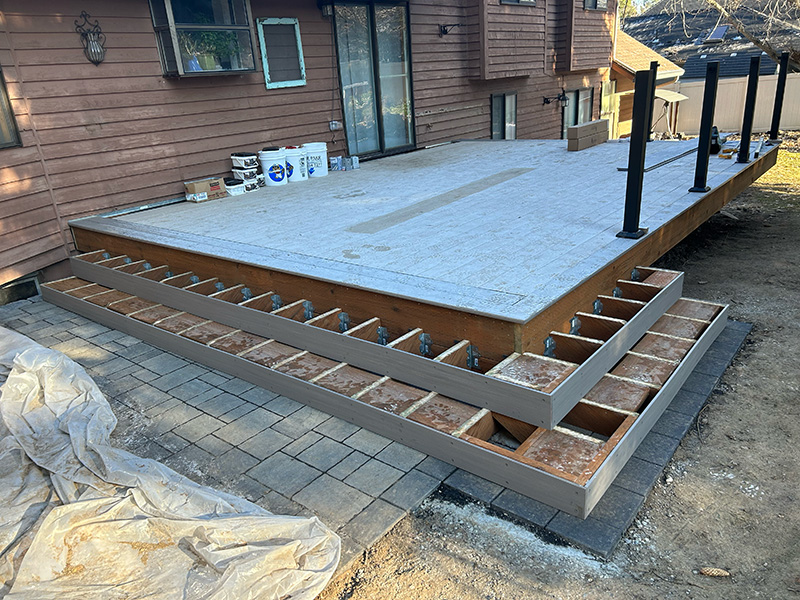
Attach the Stringers to the Deck Frame
Install extra framing on the deck where the stringers will attach. Use 2×4 blocks nailed every 1 foot to the deck and a 2×8 face board to create a surface that supports the stringers’ full width. Secure the stringers to the framing using hot-dipped galvanized nails and the appropriate hardware. Ensure the stringers are level before proceeding.
Install 4×6 Blocking for Picture Framing
Once the stringers are in place, add 4×6 blocking to both sides of each step. This blocking supports the picture frame design, ensuring that mitered corners are secure. Each step should have blocking on both sides for optimal stability and visual appeal.
Install Fascia Before the Treads
Attach fascia boards to the front of the steps, covering gaps and ensuring compliance with safety codes before installing the treads.
Adding the Stair Components
Install the Treads
Attach composite or wood deck boards to the stringers using galvanized screws. We cut and assemble the picture frame treads before attaching them to the stringers to ensure tight mitered corners. This process involves positioning the treads with the correct spacing and securing them evenly.
Apply GTape to Cut Stringers
Apply GTape to the top edge of each stringer before installing the treads. This protective tape helps prevent moisture penetration and prolongs the life of the stairs.
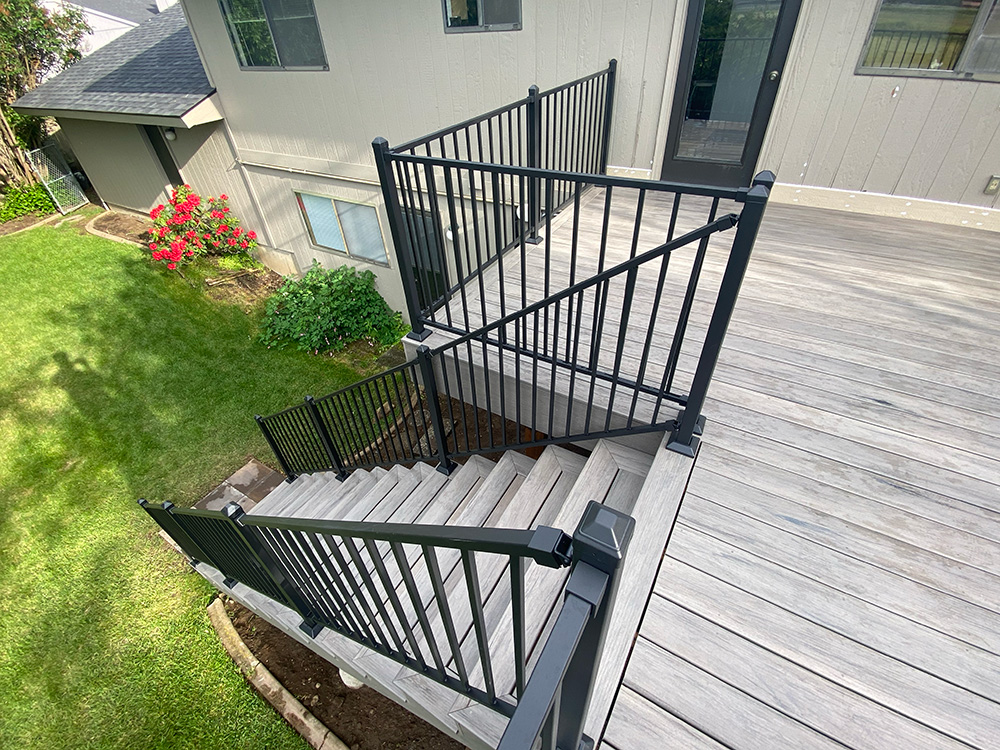
Install Stair Railings
Install the necessary blocking for the stair handrail. Secure the handrail posts to the blocking, making sure they’re sturdy and aligned with code requirements. At Pacific Northwest Decks, we typically install steel or aluminum railings for durability and a clean look.
Finishing Touches
Check for Squareness and Stability
Use a level to check that the stairs are plumb and aligned correctly. Ensure that all components are securely fastened and stable.
Maintenance and Safety Tips
Keep your deck stairs safe and in top shape with regular maintenance. Check for loose boards, tighten screws, and clean debris to prevent slipping.
Ready to Build Deck Stairs with a Pro?
At Pacific Northwest Decks, we pride ourselves on constructing high-quality deck stairs that are built to last. Whether it’s a new build or a renovation, we’ll guide you through the process from start to finish, ensuring that your stairs meet all Spokane deck regulations. Be sure to browse our deck gallery to see examples of our completed projects and get inspired for your own. Contact us to discuss your custom stair project and elevate your outdoor living experience.